Github Actions 改用 Ubuntu 24.04 编译以及 ophub 脚本打包 OpenWRT 斐讯 N1 固件,原本 Ubuntu 22.04 系统下的 workflows 直接改用 24.04 编译还没初始化完环境就报错结束,这次请教 Gemini 轻松解决了。
备用节点参考:大哥云、魔戒、飞机云、搬瓦工JMS、极客云……

Github 云编译 Lean OpenWRT 并使用 ophub 脚本打包斐讯 N1 固件(支持 eMMC)
此前使用 Github actions(Ubuntu 22.04)+ Lean's LEDE 云编译,然后 F 大脚本打包 N1 。
不过打包内核仓库 breakings/OpenWrt 已经两年没有更新了,尝试改用 ophub/kernel 也不行,没有配置好。
尝试改用 ophub/amlogic-s9xxx-openwrt 打包,打包开始一会就报错:
cp: option '--update' doesn't allow an argument
Try 'cp --help' for more information.
[💔] OpenWrt: platform-files download failed.
Error: Process completed with exit code 1.
以前不知道咋解决,尝试问 Gemini,说是系统问题:
报错的核心原因在于 Ubuntu 22.04 内置的 cp 命令版本过旧,无法兼容 ophub 打包脚本的最新语法。
ophub/amlogic-s9xxx-openwrt 仓库最近更新了底层的打包脚本,使用了带有参数的 --update 命令(例如 cp --update=none)。这种语法需要 GNU Coreutils 9.2 或更高版本才支持,而 Ubuntu 22.04 (Jammy) 搭载的是 8.32 版本,遇到带参数的 --update 就会直接报错并退出。
要解决这个问题,你只需要将 GitHub Actions 的运行环境升级到 Ubuntu 24.04 即可。
于是将原本 Ubuntu 22.04 系统下的 workflows 直接改用 24.04,不过 Initialization environment 还没跑完就报错结束,还是找 Gemini:
Ubuntu 24.04 的系统底层架构更新导致的,主要有两个致命冲突:
1 、误删了主系统软件源(核心原因): 在 Ubuntu 22.04 及以前版本,主源存在 /etc/apt/sources.list,所以大家习惯用 rm -rf /etc/apt/sources.list.d/* 来清理第三方源加快更新速度。但在 Ubuntu 24.04 中,官方采用了全新的 DEB822 格式,主源文件被移到了 /etc/apt/sources.list.d/ubuntu.sources,旧的清理脚本直接把整个系统软件源删光了,导致后续的 apt-get install 完全找不到任何基础编译包(如 build-essential)。
2 、过时的包名 python2.7: Ubuntu 24.04 的官方仓库已经彻底移除了 python2.7,且 libncurses5-dev 等包名也已被新一代的 libncurses-dev 替代。
选好编译硬件信息、订阅 helloworld 插件源、 LuCI 选好酸酸乳、去除不需要的插件,就可以开始云编译了……
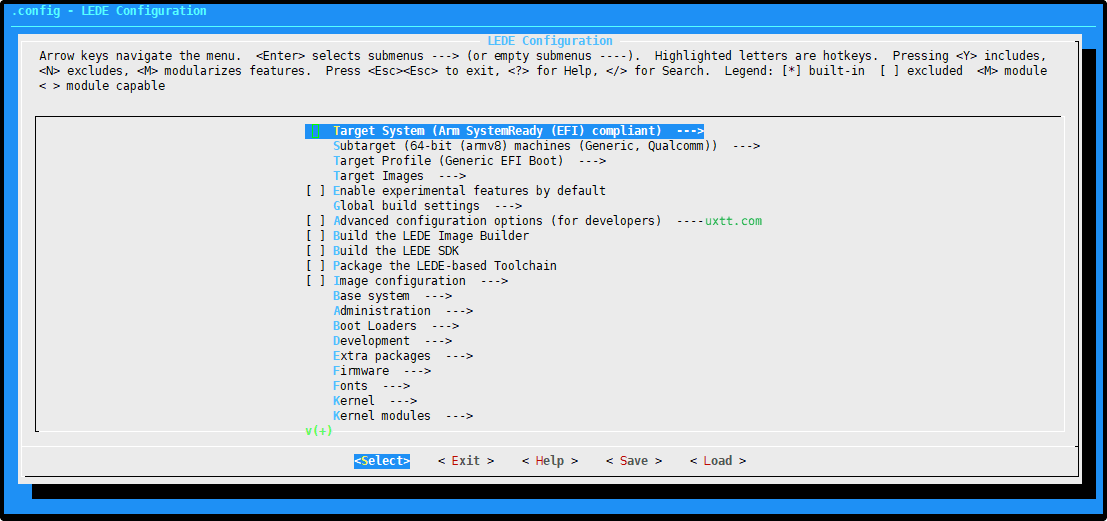
1 、参考 https://github.com/unifreq/openwrt_packit 选择必须软件包、依赖:
Target System  ->  Arm SystemReady (EFI) compliant
Subtarget ->  64-bit (armv8) machines (Generic, Qualcomm)
Target Profile  ->  Generic EFI Boot
Target Images  ->   tar.gz

*** 必选软件包 (基础依赖包,仅保证打出的包可以写入 EMMC, 可以在 EMMC 上在线升级):
Languages -> Perl
    ->  perl-http-date
    ->  perlbase-file
    ->  perlbase-getopt
    ->  perlbase-time
    ->  perlbase-unicode
    ->  perlbase-utf8

Languages -> Python -> Python3-flask
    Python3-ctypes
    Python3-flask-httpauth
    Python3-flask-login
    Python3-flask-seasurf
    Python3-flask-session
    Python3-flask-socketio
    Python3-logging
    Python3-passlib
    Python3-pyserial
    Python3-requests
    Python3-sqlite3
    Python3-xml
    Python3-yaml

Utilities -> Disc -> blkid 、 fdisk 、 lsblk 、 parted
    -> Filesystem -> attr 、 btrfs-progs(Build with zstd support) 、 chattr 、 dosfstools 、
     e2fsprogs 、 f2fs-tools 、 f2fsck 、 lsattr 、 mkf2fs 、 xfs-fsck 、 xfs-mkfs
    -> Compression -> bsdtar 或 p7zip(非官方源) 、 pigz
    -> Shells  ->  bash
    -> gawk 、 getopt 、 losetup 、 tar 、 uuidgen

 * 光影猫 (Photonicat) 依赖包:
     *  (必选, required,如果不选的话开机一分钟内会自动关机,与硬件内置的看门狗有关)
     Utilities -> pcat-manager

 * DM 路由监视器依赖包: https://hiwbb.com/2021/10/openwrt-netdata-show-temperature/
     *  (必选, required)
     Applications -> luci-app-netdata
2 、按实际需要选择需要编译的插件,比如酸酸乳 Plus 配置(点击查看)等。

编译建议带上 luci-app-amlogic / 晶晨宝盒,使用晶晨宝盒更新系统、内核更方便。
rm -rf package/luci-app-amlogic
git clone -b main https://github.com/ophub/luci-app-amlogic.git package/luci-app-amlogic
3 、 Github Action workflow 编译文件参考:
name: OpenWrt Builder(Amlogic S905x N1)

on:
  repository_dispatch:
  workflow_dispatch:

env:
  REPO_URL: https://github.com/coolsnowwolf/lede
  REPO_BRANCH: master
  FEEDS_CONF: feeds.conf.default
  CONFIG_FILE: n1.config
  DIY_P1_SH: diy-part1.sh
  DIY_P2_SH: diy-part2.sh
  UPLOAD_RELEASE: true
  TZ: Asia/Shanghai

jobs:
  build:
    runs-on: ubuntu-24.04
    permissions:
      contents: write
      actions: write

    steps:
      - name: "Check Server Performance"
        run: |
          echo "分配的服务器性能有限,若选择的插件过多,务必注意 CPU 性能!"
          echo -e "已知 CPU 型号(降序):7763,8370C,8272CL,8171M,E5-2673 \n"
          echo "--------------------------CPU 信息--------------------------"
          echo "CPU 物理数量:$(cat /proc/cpuinfo | grep "physical id" | sort | uniq | wc -l)"
          echo -e "CPU 核心信息:$(cat /proc/cpuinfo | grep name | cut -f2 -d: | uniq -c) \n"
          echo "--------------------------内存信息--------------------------"
          echo "已安装内存详细信息:"
          echo -e "$(sudo lshw -short -C memory | grep GiB) \n"
          echo "--------------------------硬盘信息--------------------------"
          echo "硬盘数量:$(ls /dev/sd* | grep -v [1-9] | wc -l)" && df -hT

      - name: Checkout
        uses: actions/checkout@v7

      - name: Initialization environment
        env:
          DEBIAN_FRONTEND: noninteractive
        run: |
          sudo rm -rf /usr/share/dotnet /usr/local/lib/android /opt/ghc /opt/hostedtoolcache/CodeQL
          sudo docker image prune --all --force
          sudo -E apt-get -qq update
          sudo -E apt-get -qq install ack antlr3 asciidoc autoconf automake autopoint binutils bison build-essential bzip2 ccache clang cmake cpio curl device-tree-compiler fastjar flex gawk gettext gcc-multilib g++-multilib git gperf haveged help2man intltool llvm libc6-dev-i386 libelf-dev libfuse-dev libglib2.0-dev libgmp3-dev libltdl-dev libmpc-dev libmpfr-dev libncurses-dev libpython3-dev libreadline-dev libssl-dev libtool lrzsz mkisofs msmtp ninja-build p7zip p7zip-full patch pkgconf python3 python3-pyelftools python3-setuptools qemu-utils rsync scons squashfs-tools subversion swig texinfo uglifyjs upx-ucl unzip vim wget xmlto xxd zlib1g-dev
          sudo -E apt-get -qq autoremove --purge
          sudo -E apt-get -qq clean
          sudo timedatectl set-timezone "$TZ"
          sudo chown $USER:$GROUPS $GITHUB_WORKSPACE

      - name: Clone source code
        working-directory: ./
        run: |
          df -hT $PWD
          git clone $REPO_URL -b $REPO_BRANCH openwrt

      - name: Load custom feeds
        run: |
          [ -e $FEEDS_CONF ] && mv $FEEDS_CONF openwrt/feeds.conf.default
          chmod +x $DIY_P1_SH
          cd openwrt
          pwd
          df -hT $PWD
          $GITHUB_WORKSPACE/$DIY_P1_SH

      - name: Update & Install feeds
        run: |
          cd openwrt
          ./scripts/feeds update -a
          ./scripts/feeds install -a

      - name: Load custom configuration
        run: |
          [ -e files ] && mv files openwrt/files
          [ -e $CONFIG_FILE ] && mv $CONFIG_FILE openwrt/.config
          chmod +x $DIY_P2_SH
          cd openwrt
          $GITHUB_WORKSPACE/$DIY_P2_SH

      - name: Download package
        id: package
        run: |
          cd openwrt
          make defconfig
          make download -j8
          find dl -size -1024c -exec ls -l {} \;
          find dl -size -1024c -exec rm -f {} \;

      - name: Compile the firmware
        id: compile
        run: |
          cd openwrt
          df -hT $PWD
          echo -e "$(nproc) thread compile"
          pwd
          make -j$(nproc) || make -j1 || make -j1 V=s
          echo "status=success" >> $GITHUB_OUTPUT
          grep '^CONFIG_TARGET.*DEVICE.*=y' .config | sed -r 's/.*DEVICE_(.*)=y/\1/' > DEVICE_NAME
          [ -s DEVICE_NAME ] && echo "DEVICE_NAME=_$(cat DEVICE_NAME)" >> $GITHUB_ENV
          echo "FILE_DATE=_$(date +"%Y%m%d%H%M")" >> $GITHUB_ENV
          sudo df -hT /opt

      - name: Package armsr-armv8 as OpenWrt
        uses: ophub/amlogic-s9xxx-openwrt@main
        with:
          openwrt_path: openwrt/bin/targets/*/*/*rootfs.tar.gz
          openwrt_board: s905d
          openwrt_kernel: 6.12.y_6.18.y
          openwrt_ip: 192.168.11.2

      - name: Organize files
        id: organize
        if: env.UPLOAD_RELEASE == 'true' && !cancelled()
        run: |
          cd openwrt/bin/targets/*/*
          ls
          rm -rf packages sha256sums version.buildinfo feeds.buildinfo openwrt-amlogic-mesongx-phicomm_n1.manifest
          sudo -E rm -rf ${{ env.PACKAGED_OUTPUTPATH }}/openwrt-armsr-armv8-generic-rootfs.tar.* || true
          df -hT $PWD
          echo "FIRMWARE=$PWD" >> $GITHUB_ENV
          echo "status=success" >> $GITHUB_OUTPUT
          pwd

      - name: Generate release tag
        id: tag
        if: env.UPLOAD_RELEASE == 'true' && !cancelled()
        run: |
          echo "release_tag=$(date +"%Y.%m.%d-%H%M")" >> $GITHUB_OUTPUT
          touch release.txt
          echo "status=success" >> $GITHUB_OUTPUT

      - name: Upload firmware to release
        uses: softprops/action-gh-release@v3
        if: steps.tag.outputs.status == 'success' && !cancelled()
        env:
          GITHUB_TOKEN: ${{ secrets.GITHUB_TOKEN }}
        with:
          tag_name: ${{ steps.tag.outputs.release_tag }}
          body_path: release.txt
          files: |
            ${{ env.FIRMWARE }}/*.gz
            ${{ env.PACKAGED_OUTPUTPATH }}/*.gz

      - name: Delete workflow runs
        uses: Mattraks/delete-workflow-runs@v2
        with:
          token: ${{ secrets.GITHUB_TOKEN }}
          repository: ${{ github.repository }}
          retain_days: 0
          keep_minimum_runs: 6

      - name: Remove old Releases
        uses: dev-drprasad/delete-older-releases@v0.3.4
        if: env.UPLOAD_RELEASE == 'true' && !cancelled()
        with:
          keep_latest: 6
          delete_tags: true
        env:
          GITHUB_TOKEN: ${{ secrets.GITHUB_TOKEN }}
配置完成,进入 Github 相应仓库,Actions,Run workflow 开始编译即可……

OpenWRT 写入 N1 eMMC
一般等上三四个小时,Actions 编译完成,build 前有绿色勾。

在 Github 仓库最新 releases 就能找到类似下面的文件:

openwrt_s905d_n1_R25.06.22_k5.15.189-flippy-93+o.img.gz
openwrt_s905d_n1_R25.06.22_k6.6.101-flippy-93+.img.gz
两个固件,随便选择一个解压,使用 rufus 写入 U 盘,插入 N1 HDMI 接口旁的 usb,插上电源,等上几分钟,N1 启动完成,浏览器打开 192.168.1.1 就能登陆 openwrt 后台(账号 root,密码 password)
服务 -- 终端,登陆成功可以看到类似如下界面:

输入 ./install-to-emmc.sh 按回车开始将 OpenWRT 固件写入 eMMC
Please select s9xxx box model: 选择 # Amlogic GXL Family 下面的 11 Phicomm N1 即可,也就是在 Please choose: 后面输入 11 然后按回车

Please select the type of shared file system 一般选择 ext4 即可:

写入完成,断开 N1 电源,拔掉 U 盘,重新上电,如无意外,稍等片刻,一个极简 OpenWRT 从 N1 的 eMMC 启动完成……
温馨提示:编译、打包成功后写入 U 盘能启动,但是使用 install-to-emmc.sh 将 OpenWRT 写入斐讯 N1 eMMC 有可能会失败,提示 Unable to determine upgrade device,建议编译带上 luci-app-amlogic / 晶晨宝盒,然后使用晶晨宝盒将 OP 系统写入、更新到 eMMC 。配置见前面内容。
晶晨宝盒操作起来更方便:
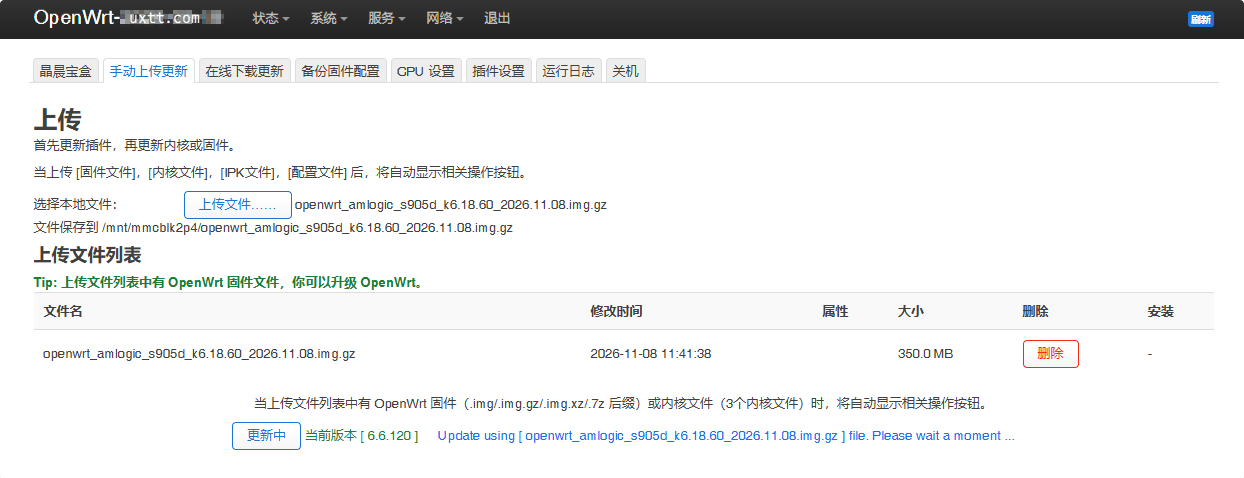
旁路由配置要点参考:
取消桥接:

关闭 DHCP:

如果开启酸酸乳科学上网后国内 App 网络异常,可在「网络-- 防火墙」中加一条自定义规则:
iptables -t nat -I POSTROUTING -o eth0 -j MASQUERADE
参考资料
https://github.com/breakings/OpenWrt
https://github.com/ophub/flippy-openwrt-actions(OpenWrt packaging Actions:Support Amlogic, Rockchip and Allwinner boxes.)
内核: ophub kernel(内核打包方法)
https://github.com/iceyheart/Cudy-TR3000-Openwrt/blob/main/.github/workflows/N1.yml
解压密码 1024 | 任何服务均有跑路风险,请注意防范!
备用节点:大哥云、魔戒、飞机云、搬瓦工JMS、极客云、扬帆云……